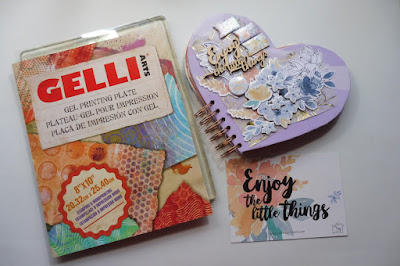
Pronto llegará el día de San valentin, y seguro que quieres sorprender a tu pareja con un regalo muy especial. Y que mejor regalo que uno hecho por ti mismo. Este bonito álbum es perfecto detalle para guardar todas esas fotos de momentos inolvidables que habéis vivido juntos. Creo que es un precioso regalo, que le va a encantar. Cuando lo abra, y vea esas fotos en este álbum.... no va a tener palabras
Soon Valentine's Day will arrive, and you will surely want to surprise your partner with a very special gift. And what better gift than one made by yourself. This beautiful album is perfect detail to save all those photos of unforgettable moments that you have lived together. I think it is a precious gift, which you will love. When you open it, and see those photos in this album .... you will not have words
Así que nos ponemos manos a la obra, para hacer el álbum. Yo te explicaré el paso a paso. Es super fácil, así que no te preocupes, y..... vamos a ello.
So we get down to work, to make the album. I will explain step by step. It's super easy, so don't worry, and ..... let's do it.
Los materiales que he utilizado para este trabajo, son los papeles y complementos de la colección Natura de Miss mama Mint y mi Gelli plate de Gelli Arts®
The materials that I have used for this work, are the papers and complements of the Natura collection of Miss mama Mint and my Gelli plate of Gelli Arts®
También he usado las pinturas acrílicas premium de American decoart. He escogido los colores que mejor iban con la colección, pero puedes coger los colores que mas te gusten, o los que mejor vayan con el papel que vayas a usar.
I have also used American decoart premium acrylic paints. I have chosen the colors that best went with the collection, but you can take the colors you like best, or those that best go with the paper you are going to use.
Vamos con el paso a paso:
We go with the step by step:
1. Cortamos la mitad de un folio A4. En esa mitad, dibujamos un corazón, lo mas grande que podamos, que nos ocupe lo máximo posible de esa media hoja. Y lo recortamos. Esa será la plantilla para todo el álbum.
Lo marcamos 2 veces sobre un cartón y lo recortamos con un cutter o una tijera.
1. Cut half of an A4 sheet. In that half, we draw a heart, as big as we can, that occupies us as much as possible of that half sheet. And we cut it. That will be the template for the entire album.
We mark it 2 times on a cardboard and cut it with a cutter or scissors.
2. Con la misma plantilla, cortamos también 2 corazones de cada hoja de los papeles de la colección. Reservamos 3 hojas de los papeles para forrar las tapas del álbum. Con esas 3 hojas, forramos la portada y contra portada que habíamos cortado de cartón.
2. With the same template, we also cut 2 hearts from each sheet of the collection papers. We reserve 3 sheets of papers to cover the album covers. With those 3 sheets, we lined the front and back cover that we had cut from cardboard.
3. Con la gelli, vamos a decorar la parte de detrás de las hojas de papel de la colección Natura, que habíamos recortado. Esta colección viene impresa a una sola cara, así que la cara blanca, la vamos a decorar con nuestra gelli, pintura acrílica y los stencils de miss mama mint.
3. With the gelli, we will decorate the part behind the sheets of paper from the Natura collection, which we had cut out. This collection is printed on one side, so the white face, we will decorate it with our gelli, acrylic paint and the stencils of miss mama mint.

4.Ya tengo las hojas decoradas y las tapas forradas, así que con un espiral, voy a encuadernar el álbum con la cinch.
4. I already have the decorated sheets and the covers covered, so with a spiral, I am going to bind the album with the cinch
Para decorar el interior del álbum he usado algunos diecuts y el sello de la colección Natura. Os enseño algunas de las paginas, como han quedado.
To decorate the interior of the album I used some diecuts and the seal of the Natura collection. I show you some of the pages, as they have been.
5. Para decorar la portada del álbum, utilizo el papel vellum, los diecuts, pegatinas, y chapas de Natura de Miss mama mint.
5. To decorate the album cover, I use vellum paper, diecuts, stickers, and Natura plates from Miss mama mint.

Y una vez decorado, ya tenemos el trabajo terminado. Ya solo queda, poner dentro nuestras fotos y recuerdos.
And once decorated, we have the work done. There is only left, put inside our photos and memories.

Si quieres ver el tutorial en youtube, paso a paso, aquí tienes el enlace. Este vídeo tiene Subtitulos en inglés, para que te sea mas fácil entenderlo. Espero que te haya gustado mi trabajo, y si es asi, no olvides dejarme un comentario y darme un like. Nos vemos en el próximo tutorial .
If you want to see the tutorial on YouTube, step by step, here is the link. This video has English subtitles, to make it easier for you to understand. I hope you liked my work, and if so, do not forget to leave me a comment and give me a like. See you in the next tutorial.


No hay comentarios:
Publicar un comentario